Saturday, August 29, 2009

Interface Flash with PHP in ActionScript 3

Interface Flash with PHP in ActionScript 3
We will interface Flash and PHP pass variables from Flash to PHP with the POST method

1. First we do not need a big Stage so create a new flash file, name it "phpFlash.fla" and hit Ctrl+J to bring up the document properties window and change the stage width and height to 250 and 200 resp.
2. Select the Text Tool and go to the properties panel and select Input Text and click on Show border around text. Now create three text fields like this
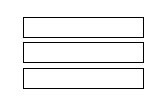
go to the properties panel and give them instance names of "fName_txt", "lName_txt", "email_txt" resp.


3. Now Change the text type to Static and create labels for the input text boxes like this
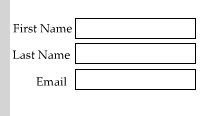
4. Now Hit Ctrl+F8 to bring up the New Symbol window. Name it submit_mc. draw your own button and Label it "Submit". Now return to the main Stage and drag the instance of the button on the Stage from the Library window.
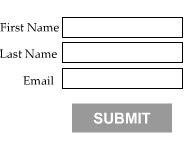
Go to the Properties Panel and give it the instance name of submit_mc.

5. Next create a new Layer, rename it "Actions" and select the first frame. Hit F9 to bring up the Actions Window nad copy and paste the following piece of code

/*Wait for the button to be clicked*/
submit_mc.addEventListener(MouseEvent.CLICK,postData);

function postData(e:MouseEvent) {
var myRequest:URLRequest = new URLRequest("phpFlash.php");
var variables:URLVariables = new URLVariables();

/*These will be the $_POST variables*/
variables.fname = fName_txt.text;
variables.lname = lName_txt.text;
variables.Email = email_txt.text;

/*assign the URL variables to the request*/
myRequest.data = variables;

/*Select the request method as POST*/
myRequest.method = URLRequestMethod.POST;

/*go to the given page*/
navigateToURL( myRequest);
}

Hit Ctrl+Enter to get your phpFlash.swf file.

6. Now we create the .php file. Name it phpFlash.php and open in a text editor. The .swf file will be embedded in this file itself. Copy and paste the following Script

<html>

<body bgcolor="#ffffff">

<div align=middle>

<object width="550" height="400" id="c1" align="middle">

<param name="movie" value="phpFlash.swf" />

<param name="quality" value="high" />

<param name="bgcolor" value="#ffffff" />

<embed src="phpFlash.swf" quality="high" bgcolor="#ffffff" width="250" height="200" />

</object>

</div>


<?php

$fname=$_POST[fname];

$lname=$_POST[lname];

$email=$_POST[Email];

echo "First Name - ";

echo $fname;

echo "</br>LastName - ";

echo $lname;

echo "</br> Email - ";

echo $email;

?>

</body>

</html>


7. Make Sure the .swf and the .php files are in the same folder and in the root diretory of the server. Run the php file from a browser. Type in the boxes and hit Submit and Voila what you have typed will appear on stage through the PHP script. Hope you can use this in a much more complicated application of yours

Create your own .flv Video Player with Timeline Seek Playhead

This is a progressive download .flv video player with play, pause and stop buttons with sliding volume controller and timeline seek

There are two ways you can play a video. firstly you can embed the .flv video in the .swf file which creates very large and unmanageable files or you can dynamically load the video file which can be done in two ways. First is a streaming video but you will need the Flash Media Server for it or you can have progressive downloaded video like this one which does not need any additional softwares. The actual coding to play a both types of videos is more or less the same

1. First we design the stage. Hit Ctrl+J to bring up the document properties window. Select #333333 as the background color. Now create 2 more layers and name the top most Actions.
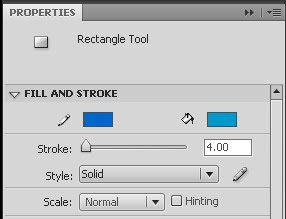
2. Hit Ctrl+F8 to bring up the New Symbol window and give the name play_mc. Click on ok and create your own button. Mine looks like this

Now repeat the above process twice and give in the names stop_mc and pause_mc.


make sure atleast the play and pause buttons have exactly the same shape and size. Now select the first frame of the middle layer and drag the play_mc and stop_mc buttons from the library onto the stage and place them near the bottom. Give them instance names of play_mc and stop_mc

now select the first frame of the bottom most layer and drag the pause button onto it from the library. Give the instance name pause_mc, now from the properties panel set the x and y coordinates of the pause button to be same as that of the play button.Since the pause button is exactly of the same shape and size and is on a lower layer it will be completely hidden.

3.Now again select the first frame of the bottom most layer draw a small line on the side of the buttons with lentgh of 100. make a note of the x and y coordinates. Here its 240 and 385 resp.

Hit Ctrl+F8 again and this time give the name slider_mc and draw a 16x16 black sqaure and centre it. Go back to the main stage and select the first frame of the middle layer and drag the slider_mc from the library onto the stage and set its coordinates as 340 (240+100) and 385. Give it the instance name of slider_mc in the properties panel


4. Select the Text Tool and draw a dynamic text field near your objects. This will show the duration so place it appropriately. Give it the instance name of dur_txt

5. now on the bottom most layer above your buttons draw a thin rectangle of length 350 and again make a note of its x and y coordinates. here they are 108 and 357.

Hit Ctrl+F8 again and this time give the name playSeek_mc. Follow the steps as in the volume controller but this time the instance name would be playSeek_mc and the x and y coordinates will be 108 and 360 resp;

6. Now get your .flv file and save it in the same folder as this .swf file and name it myFLV.flv or whatever you want.
7. That done select the first frame of the Actions layer and copy and paste the following code


/*------------------------Video Playback-----------------------------*/
import flash.net.NetConnection;

addEventListener(Event.ENTER_FRAME,trackDuration);

/*several objects have to be declared*/
var videoConnection:NetConnection = new NetConnection();
videoConnection.connect(null);
var videoStream:NetStream = new NetStream(videoConnection);
var video:Video = new Video();
var obj:Object = new Object();

var vDuration=0;/*will contain the total duration of the video*/

/*onMData function called if metadata is detected. Metadata is encoded into
the video by the encoding software*/

obj.onMetaData = onMData;
videoStream.client = obj;

/*Set the dimensions and position of the video*/
video.x=75;
video.y=20
video.width=400;
video.height=300;

addChild(video);/*actually add the video*/
/*all operations will be on the videoStream object*/
video.attachNetStream(videoStream);

function onMData(obj:Object) {
/*Calculate the total duration of the video*/
vDuration=obj.duration;
}

/*denotes whether timeline seekhead is being dragged*/
var isDragging=0;

/*show the duration on stage*/
function trackDuration(e:Event) {

/*videoStream.time give the duration already played*/
dur_txt.text=videoStream.time.toString()
+" / "+vDuration;

/*if seek head not being dragged.This actually helps in smooth dragging
remove this line to see what happens when you drag without this*/

if(isDragging==0)

/*advance the seek head according to duration played
180 is the start position of the seekhead and 350 is
the total lentgh it can be dragged */

playSeek_mc.x = 108+(350*videoStream.time/vDuration);
}

var isPlaying=0;/*denotes if the video is playing*/
var isPaused=0;/*if video is paused*/

play_mc.addEventListener(MouseEvent.CLICK,playHandler);
stop_mc.addEventListener(MouseEvent.CLICK,stopHandler);
pause_mc.addEventListener(MouseEvent.CLICK,pauseHandler);

/*if play button is clicked*/
function playHandler(e:MouseEvent) {
if(isPlaying==0)/*if not already playing*/
{
videoStream.play("myFLV.flv");/*start playing from the beginning*/
isPlaying=1;
}
if(isPaused==1)/*if paused*/
{
videoStream.resume();/*resume playing*/
isPaused=0;
}
e.currentTarget.visible=false;/*hide the play button*/
}

/*if pause button is clicked*/
function pauseHandler(e:MouseEvent) {
videoStream.pause();/*pause play*/
isPaused=1;
play_mc.visible=true;/*show play button*/
}

/*if stop button is clicked*/
function stopHandler(e:MouseEvent) {
videoStream.close();/*stop playing by closing the stream*/
isPlaying=0;
play_mc.visible=true;/*show play button*/
}
/*-------------------------------------------------------------------------------*/

/*------------------------Volume Control-----------------------------------------*/

/*denotes the rectangle boundary in which the volume controller can be dragged
parameters are x,y, width, height. Height=0 since only horizontal movement
is required*/

var rect:Rectangle = new Rectangle(240,385,100,0);

/*--define mouse event handlers for the sliding control---*/

slider_mc.addEventListener(MouseEvent.MOUSE_DOWN,dragStart);

/*notice that the handling function in the following two listeners are the same*/
slider_mc.addEventListener(MouseEvent.MOUSE_UP,dragStop);
slider_mc.addEventListener(MouseEvent.MOUSE_OUT,dragStop);

slider_mc.addEventListener(Event.ENTER_FRAME,adjustVolume);
/*------------------------------------------------------------*/

/*enable dragging if mouse button pressed on it*/
function dragStart(e:MouseEvent) {
slider_mc.startDrag(true,rect);
}

/*stop dragging if moue button released or pointer moved away*/
function dragStop(e:MouseEvent){
slider_mc.stopDrag();
}

function adjustVolume(e:Event) {
/*calculate the volume. 240 is the minimum position and
100 is the width of the drag boundary rectangle "rect"*/

var vol=(slider_mc.x-240)/100;
var volChange:SoundTransform = new SoundTransform(vol);

/*assign the new volume*/
videoStream.soundTransform = volChange;
}
/*--------------------------------------------------------------------------------*/

/*-------------------Timeline Seeking--------------------------------------------*/

/*define mouse event handlers on the timeline seek head*/
playSeek_mc.addEventListener(MouseEvent.MOUSE_DOWN,playDragStart);
playSeek_mc.addEventListener(MouseEvent.MOUSE_UP,playDragStop);

/*denotes the rectangle boundary in which the timeline seek head can be dragged
parameters are x,y, width, height. Height=0 since only horizontal movement
is required*/

var rect1:Rectangle = new Rectangle(108,360,350,0);

/*enable dragging if mouse button pressed on it*/
function playDragStart(e:MouseEvent) {
/*drag only if video is playing and is not paused*/
if(isPlaying==1&&isPaused==0)
{
playSeek_mc.startDrag(true,rect1);
isDragging=1;
}
}

/*stop dragging if moue button released from it*/
function playDragStop(e:MouseEvent){
playSeek_mc.stopDrag();
isDragging=0;
/*determine the position of the seeh head. 108 is the minimum position
350 is the width of the drag boundary rectangle rect1*/

var seekHead=(playSeek_mc.x-108)*vDuration/350;

/*start playing from the position denoted by the seek head*/
videoStream.seek(seekHead);
}

/*-----------------------------------------------------------------------------*/


Now hit Ctrl+Enter and test your movie.


\m/\m/\m/\m/

Thursday, August 27, 2009

Make a Custom Cursor and Draw with the Mouse in Actionscript 3

We'll make a custom cursor which will replace the mouse pointer and we will also be able to draw with it
1. First we'll draw the cursor. You can make it to look like anything you want. This is how my cursor looks like

To draw it first select the Rectangle Tool and select Fill Color of #CC0033 and no stroke color. Now draw a small rectangle of width 50 and height 25;

Now click outside the rectangle and approach the bottom right corner of the rectangle with the mouse pointer. When an inverted L sign appears press down on the mouse button and drag the corner upwards halfway through the side

do that on both sides to get the triangle. Now similarly drag the left vertical side inwards th get something like this

Select the shape and hitF8 and save it as a MovieClip Symbol with the name cursor_mc. Go to the properties panel and give it the instance name of cursor_mc.
Double Click on the shape o edit it and select the shape inside.Select Free Transform Tool(Q) and rotate it so that it looks like this


Now select it and hit Ctrl+C to copy it. Create a new layer drag it below the original layer and hit Ctrl+V to paste it. Now go to the Color window and change the fill color to #4B0101 and then go to the Transform window and change the size in both the horizontal and vertical directions to 125.


Your stage should look like this.


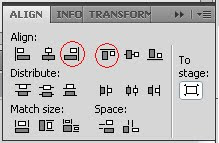
Select select both shapes and go to the Align window and click on the following buttons circled in red.

Your shapes should look like this


Now manually arrange them to like

Make a note of the centre of the MovieClip denoted be the small cross sign because your pointer will actually be that point. So for my arrow shaped cursor the centre should be just inside the arrow point.
Now return to the main Stage. Create a new layer and rename it as Actions. Select the first frame and hit F9 to open the Actions window.
Copy and paste the following code. Hope the documentation is sufficient


addEventListener(Event.ENTER_FRAME,followMouse);
addEventListener(MouseEvent.MOUSE_DOWN,mouseDownHandler);
addEventListener(MouseEvent.MOUSE_UP,mouseUpHandler);


/*-------------------CUSTOM CURSOR-------------------*/
function followMouse(e:Event) {
Mouse.hide();/*hide the mouse*/

/*follow the mouse coordinates*/
cursor_mc.x=mouseX;
cursor_mc.y=mouseY;
}
/*-----------------------------------------------------*/


/*------------------DRAWING----------------------*/
/*draw only if the mouse button is pressed and the mouse is moving*/
function mouseDownHandler(e:MouseEvent) {
e.currentTarget.addEventListener(MouseEvent.MOUSE_MOVE,mouseDMoveHandler);
/*lineStyle(thickness,color,alpha)*/
graphics.lineStyle(5,0x00CC77,1);
/*move to the point with given coordinates*/
graphics.moveTo(mouseX,mouseY);
}

function mouseDMoveHandler(e:MouseEvent){
/*draw a line to the given coordinates from the coordinates in "moveTo"*/
graphics.lineTo(mouseX,mouseY);
}

function mouseUpHandler(e:MouseEvent){
/*to stop drawing when the mouse is up line thickness
and alpha changed to zero.Technically the line is still being drawn
but with 0 thickness and alpha so it's not visible*/

graphics.lineStyle(0,0x00CC77,0);
}
/*-----------------------------------------------------*/

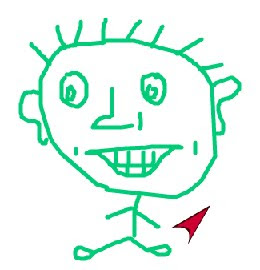
Now hit Ctrl+Enter to test your movie. To draw press and hold the left mouse button and drag it just as in any image editing software. There may be some problem if you move the mouse very fast but other than that you can draw anything

Pardon my drawing but enjoy!

Wednesday, August 26, 2009

XML Driven Advanced Horizintal Dropdown Menu with Tween effects in Actionscript 3

Visit this link to see the menu in action -:

http://www.fileden.com/files/2009/9/5/2565234/menu1.swf

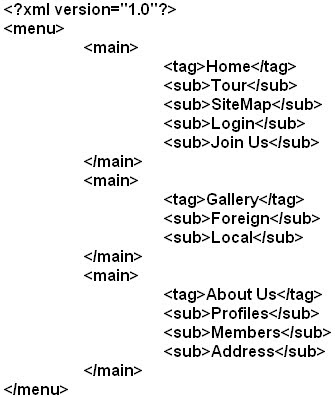
First the contents of the menu must be put down in a XML file in the following format.

Each "main" tag gives the name of a main menu button in the "tag" tag and each "sub" tag gives the label of the sub menu buttons under it.
Let's name this file "myXML.xml". Remenber The flash(.fla) file and the XML file must be saved in the same folder.

Now open your flash file and hit Ctrl+Jto bring up the Properties Panel and set the background color as Black. Click OK and hit Ctrl+F8 to bring up the New Symbol window. Enter the name as mnMenu_mc and click on Advanced. Select Export for Actionscript. Click OK.

Select the Rectangle Primitive Tool and draw a small rectangle. This will be your Main Menu button. You can use any shape, size or color. But you have to make a not of the width of the button. Here i use a 65*20 rectangle with the fill color #0033CC. Now ceate a new layer on top of the present one and create a dynamic text field that almost fills up the button.


Select the text field and go to the Properties Panel and give it the instance name of text_txt. Now select both the button and the text field and open the Align Window and center both the objects.

Repeat the process and this time give the name as sbMenu_mc. You may choose a different shape or color if you like. The name of the text field will be the same as before.


This will be your sub menu button. Again make a note of the width of the button.

Thats all the graphics you need so now we script! Select the first frame of the only layer that sould be on your stage and hit F9 to bring up the Actions window. Copy and paste the following code. I hope the documentation is sufficient


Now hit Ctrl+Enter to test your movie! Mine looks something like this after i click on home but the actual coolness lies in the Tweens. Have fun!!

Sunday, August 23, 2009

Simple MP3 Music Player with sliding volume controller in Actionscript 3

We will create a music player that will have the following :-

1. Play Button. 2. Stop Button. 3. Pause Button *4. Sliding Volume Controller
The mp3 file you want to play should be in the same folder as the flash file. Let's assume its name is myMusic.mp3.

1. Play Button:-
i> We first need to draw the button. Hit Ctrl+F8 and name the New Symbol as "play_mc" without the quotes. You can draw it to look like anything you like. I'll draw it like this.

If you are new to flash you might be wondering about how to draw a triangle. The easiest way is to draw a small square and then click outside it now select the Selection Tool(V) and move the mouse near a vertex of the square. You will notice an inverted L sign under the pointer. Press the left mouse button and drag the vertex up
do it on both sides
and you get you triangle


ii> Now drag the button on to the Stage and select it. Open the Properties Window and set the instance name as play_mc.

2. Stop Button:-
i> Make it in the same way as before and name it as "stop_mc" without the quotes.
ii> Drag it onto the stage and give it the instance name of "stop_mc" without the quotes.

3. Pause Button:-
Same as before just give the names as "pause_mc".

You should have the three buttons on stage and it should look like this


4. Sliding Volume Controller:-
i> Create a new Layer and drag it below the layer that has the three buttons. Now draw a line below the buttons and then go to the properties panel to set the width as 100. Make a note of the X and Y Coordinate of that line. Here it's 215 and 265 respectively.


ii>Now select the first frame of the layer that has the three buttons. Draw a small circle which will be the actual slider. Select it and Hit F8 and save it as slider_mc. Double click on it to edit it and centre the cicle. Return to the Main Stage and go to the properties panel and give the instance name as slider_mc and set its X and Y coordinate as 315 (215+100) and 265 respectively.


Now we'll make the buttons work! Create a new layer and name it Actions. Select the first frame and Hit F9 to bring up the actions Window. Copy the following piece of code:-


var isPlaying = 0;//flag denotes whether the music is playing(1) or has been stopped(0)
var pos=0;//denotes the position in which the music was paused var mySound:Sound = new Sound(new URLRequest("myMusic.mp3"));//load the mp3 file
/*define the area in which the slider will move the arguments are X, Y, width, height*/
var rect:Rectangle = new Rectangle(215,265,100,0);

/*define the sound channel*/
var myChannel:SoundChannel=new SoundChannel();

/*define mouse event listners for the buttons and the slider*/
play_mc.addEventListener(MouseEvent.CLICK,playMusic);
stop_mc.addEventListener(MouseEvent.CLICK,stopMusic);
pause_mc.addEventListener(MouseEvent.CLICK,pauseMusic);
slider_mc.addEventListener(MouseEvent.MOUSE_DOWN,dragStart);
slider_mc.addEventListener(MouseEvent.MOUSE_UP,dragStop);
slider_mc.addEventListener(MouseEvent.MOUSE_OUT,dragStop);

/*the slider will invoke the "adjustVolume" function*/
slider_mc.addEventListener(Event.ENTER_FRAME,adjustVolume);

/*PLAY BUTTON*/
function playMusic(e:MouseEvent) {
if(isPlaying==0)
myChannel=mySound.play();
isPlaying=1;
}

/*--------------STOP BUTTON--------------*/
function stopMusic(e:MouseEvent) {
if(isPlaying==1)
myChannel.stop();
isPlaying=0;
pos=0;
}
/*----------------------------------------*/

/*--------------PAUSE BUTTON--------------*/
function pauseMusic(e:MouseEvent) {
/*if music is playing*/
if(isPlaying==1)
{
pos=myChannel.position;//record position
myChannel.stop();
isPlaying=0;
}
/*if music is paused*/
else
{
isPlaying=1;
myChannel=mySound.play(pos);
}
}
/*----------------------------------------*/

/*--------------SLIDING CONTROLLER--------------*/
function dragStart(e:MouseEvent) {
slider_mc.startDrag(true,rect);
}

function dragStop(e:MouseEvent){
slider_mc.stopDrag();
}

function adjustVolume(e:Event) {
var vol=(slider_mc.x-215)/100;
var volChange:SoundTransform = new SoundTransform(vol);
myChannel.soundTransform = volChange;
}
/*----------------------------------------*/

That's it. Hit Ctrl+Enter to check your own Music Player!!

Saturday, August 22, 2009

The Tween Class in ActionScript 3

Today we'll learn about the Tween class and apply it to a practical example.


1. Open a new flash file. Hit Ctrl+J to bring up the Document Properties and change the background color to black.


2. Then press Ctrl+F8 to open the New Symbol window and name it as btn1_mc. We will make a button. Now select the Rectangle Tool(R) and change the Stroke color to #0066CC and the fill color to #0099CC. You can use any other color.
Go to the Properties Panel and set the stroke thickness as 4.


3. Draw a rectangle of the size you want you button to be. A width of 120 and a height of 40 should suffice. After drawing, select the rectangle and go to the align panel and centre the rectangle.


4. Create a new layerand select the Text Tool(T) and create a label for your button. I will name it "HOME". Go to the Align Panel and centre the text box too.


5. Now Click on Scene1 to return to the Stage.

6. Go to Window->Library and you will see the btn1_mc movie clip. Right Click on it and create two duplicates and name them btn1_mc and btn3_mc respectively. Change the color and the text labels on the duplicate if you want to. I will name them "Gallery" and "About Us". Changing the color will help us understand a particular issue we'll address later.
Now drag each button onto the stage and arrange them somewhat like this


7. Select each button and go to the Properties Panel button and give them instance name as btn1_mc, btn2_mc and btn3_mc

8. Create a new layer, name it Actions and select the first frame and hit F9 to bring up the Actions window. We are ready to write the script.

9. To script tweens we first need to import the Tween Class like so -

import fl.transitions.Tween; import fl.transitions.easing.*;

Now we'll implement the tween so that the button changes size when we RollOver and return back when we RollOut therefore for each button we must add RollOver and RollOut listeners.

btn1_mc.addEventListener(MouseEvent.MOUSE_OVER,mouseOverHandler); btn1_mc.addEventListener(MouseEvent.MOUSE_OUT,mouseOutHandler); btn2_mc.addEventListener(MouseEvent.MOUSE_OVER,mouseOverHandler); btn2_mc.addEventListener(MouseEvent.MOUSE_OUT,mouseOutHandler); btn3_mc.addEventListener(MouseEvent.MOUSE_OVER,mouseOverHandler); btn3_mc.addEventListener(MouseEvent.MOUSE_OUT,mouseOutHandler);


These listeners will invoke the "mouseOverHandler" function on the RollOver Event and the "mouseOutHandler" function on the RollOut Event
Now we will define the two functions

function mouseOverHandler(e:MouseEvent) { e.currentTarget.alpha=.8;//altering alpha makes the change more prominent new Tween(e.currentTarget,"scaleX",Elastic.easeOut,e.currentTarget.scaleX,1.25,1,true); new Tween(e.currentTarget,"scaleY",Elastic.easeOut,e.currentTarget.scaleY,1.25,1,true); } function mouseOutHandler(e:MouseEvent) { e.currentTarget.alpha=1; new Tween(e.currentTarget,"scaleX",Elastic.easeOut,e.currentTarget.scaleX,1,1,true); new Tween(e.currentTarget,"scaleY",Elastic.easeOut,e.currentTarget.scaleY,1,1,true); }


"e.currentTarget" gives the child on which the Event has occured. The arguments of the Tween function is as follows :- 1. the object, 2. the property that has to be tweened, 3. Type of tween, 4. Start value, 5. End value, 6. Duration in Seconds, 7. Use Seconds(boolean).


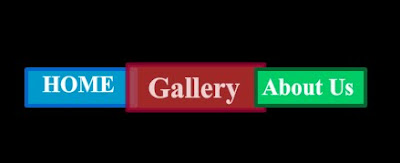
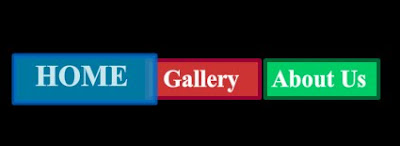
10. if you have copied all of the code hit Ctrl+Enter to test your movie. Rollover your buttons you'll see them growing and shrinking but notice that we have a problem that is most apparent when we rollover the middle button.


The middle button grows over the first button but goes under the last button. That happens with the first button too

11. As you might have guessed, to solve this problem we have to change the depth of the button and bring it to the topmost layer. To do that add the following line of code to the "mouseOverHandler" function.

setChildIndex(getChildByName(e.currentTarget.name),numChildren-1);

"numChildren" give the total number of children present. Thus by setting the index to "numChildren-1" we actually swap the depths of the present child with that of the topmost child.
Hit Ctrl+Enter to test you movie. The problem is solved!!


So there you have it. The buttons look really good with the Tween. You can choose different kind of tweens. Instead of the Elastic easing used here you can choose from Back, Bounce, None, Regular, Strong and instead of easeOut you can use easeIn or easeInOut. Select the tween that suits your application the best.